Monday, May 30, 2011

Cards for our Service Men and Women


 Last Friday I was invited by a friend of mine to participate in a great project. She has collected many card fronts from attending card swap events. So she decided to part with them and finish them. We had a great assembly line going. One person would cut the card stock for the base of the card. Another person would score the card stock, another would crease the cards, and so on and so on. Well after about 4 hours we managed to put together 484 cards to donate. They will go to our service men and women who are serving this great and beautiful country of ours. That way they will have cards to send home to their loved ones.

  It was a great honor and pleasure for me to participate in this event. I have many family members who have served and who are currently serving our great counrty. It makes my eyes a bit misty, but out of pride for our service men and women. I hope this will become a tradition for years to come.

 Thank you all and I hope you had a great Memorial Day today.

Sunday, May 29, 2011

The Man of my Dreams


  The man of my dreams. I woke up Saturday morning to find my husband out side with the kids, wearing my 4 year old sons cowboy hat, and playing with my Gypsy. What !!!!! Yes he was. Not only did he figure out, after a long time how to use it. He also decided to actually cut something that he designed.


 If you can see, he decided to use some diamond plate vinyl that I have on hand, and make a decal for his truck.

  Once he was done, he went outside and started to apply his new decal on the truck.

 This is the finished decal, that my wonderful husband did all on his own. He made 2 for each side of the truck. What a man!!!

 I thought I would share this great story with you all.

Have a wonderful Sunday and a great Memorial week-end


Happy Crafting

Tuesday, May 17, 2011

My First Faith Crop


  This last week-end I attended my very first Faith Crop. It was a 2 day crop and all meals were provided as well as drinks and snack for the entire both days. They also had a person doing pedicures and another person giving massages for a very minimal price.  I had such a good time, that I can't wait to go the the next one in October.

 I worked on a very special project, that I wish I can share with you right now, but you are going to have to wait. I am really sorry, but I promise it will be worth the wait. I am very impressed with myself with the progress that I have made on it. I will take plenty of step by step progress pictures of my project, so you can see how it all got put together.

 How ever I did hit a point where I could not continue any further with out a bit of computer work from home. In the mean time, I purchased 4-2 page layout kits from Teri Schoeni from Heart2Home. So I am going to share the kits that I purchased and put together, with you tonight.

This one is a Grandma Gardening layout


This one is a butterfly layout

This one is another butterfly layout

This is a close up of the beautiful flowers that Teri made. I just love them.

I still haven't completed the 4th kits, but I promise you it's just as beautiful as these 3 that I already assembled.

If you like her work check out her website link at the bottom of my blog. Heart2Home


Thank you for stopping by, and Happy Crafting.

See you soon


Sunday, May 15, 2011

Follow by email option now on my blog

I finally figured out how to add a link to follow me by email. Thank you Brandon for your help. I hope you sign up for email updates to my blog.


Have a great day.

See you very soon with a new post

Wednesday, May 11, 2011

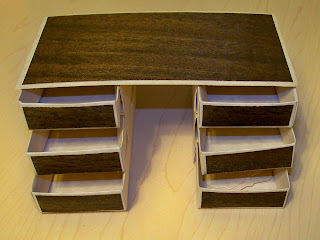
Very Cute Paper Desk

Yesterday a very good friend of mine stopped by to get her Gypsy Updated. While her Gypsy was doing it's thing, we snuck in some crafting time. She brought her Matchbox, Sizzix SU die. She had seen this cute little desk on a blog somewhere and we tried to make it. It was super easy to make. It looks a lot more complicated. I used ARC Speckle paper and DCWV (dsp) scrap piece of paper for an accent. I also use these really cute pebbles that I purchased at Heart2Home. There is a link at the bottom of my blog if you are interested in getting various colored pebbles. The plug is over LOL.
I had some pictures of my kids that worked perfect to create little mini picture frames for the top of the desk. I need to make an easel back for them to stand up.
 Here are 2 that my friend made, 1 is not completely finished but still looks really cute.
 She used some of my scrap wood sheet of paper which I also got at ARC. It really looks cool, I think.

 Thank you for stopping by and Happy Crafting.

Graduation Cards


  I can't believe the school year is almost over. Now that I am a little older, it seems like time is flying by way too fast. My 2 Little ones will be going to pre-school this fall. Now you know that I will have the water works going. Anyways, My Mother and Mother-in-Law needed some graduations cards. So this is what I came up with. I saw this on Vickey Lopez's blog and I altered it just a bit. You can visit her blog at http://kreation-korner.blogspot.com/ She has some really great work on her blog, stop by and leave her some love.

So I was lucky that 2 cards were going to be the same colors, and the other is for a UNLV graduation.
I did add a little bling just for some extra something something lol. I love bling, can you tell. For the cap on the front of the card I used a 1 3/8, and 1 1/4 SU square punch and put a brad in the smaller square. I also divided them up with some dimensionals so you can see the 2 layers. The Stamp sets I used were SU Word Play, Teeny Tiny Wishes, and Curly Cute. I also used SU Modern Label and Word Window punches. For the inside I used the popular SU Top Note Die, I cut 6 in black card stock and 3 in white card stock. I used a great layering trick I have seem on many blogs. I cut each black top note in half the long way and then another top note the short way. When you put all the layers together it looks like a shadowed top note. I just love this little trick.
  I hope the Graduates like my cards, and have a very successful future, Best wishes to you all.


Thank you for stopping by today, and have a great Crafternoon.


Tuesday, May 10, 2011

Pack Your Bags Layout

 This is a layout that was design by Danita Richardson-Hunt. This is her first Cricut Diva Design that she made. She is still learning the cricut, and is doing a great job. Now the real challenge is to get her to use her Gypsy. LOL
This is my interpretation of her layout, I had no instructions, but I managed to come really close to hers. I did add a sand castle to it, because I can't imagine a beach without one. The Cricut Divas meet monthly at The Crafting Place in Henderson,the address is 3560 E. Russell Rd.

 The cartridges used for this layout are Pack Your Bags, and Life's a Beach. I put all of my images on the Gypsy to save time and paper.
 I hope you like this layout, Danita did a great job.


I hope you are having a great Crafternoon :)


Card/Calendar Book

   I made some more calendar/card books for my mother to give out for Mother's Day. This is what I did for her. I found this paper at M's and it was marked $.14 clearance. So I picked up the only 4 sheets they had, and headed to the register. I got a great deal, because they rang up for ONLY $.01 clearance. I am still excited about the score, whoooo hooooo!!!!!
  Anyways I thought the paper was so pretty I used it to cover the front of my books. I also added the word CARDS from the cartridge Storybook, I layered it to give it a little more dimension. I of course used my trusted Gypsy and My New Expression 2 to cut it with.
 I wont bore you with each page but I will include  2 pages , so you can see how it looks inside with a card. The card I made is from the Stand & Salute cartridge.
  I am still very new to the Binding craft. So when I used my new Cinch machine I was so excited that I didn't cinch the coils properly so they look a little distorted. Well, there is a cure for that RIBBON. I added ribbon to cover my imperfections. SHHHH don't tell anyone LOL.


Thank you for stopping by today
Happy Crafting

Monday, May 2, 2011

Fancy Note Pads

 Hello there and Happy Monday to you all. Today I was able to meet some friends for some crafting time. I love it, when I can get together with other crafters and share ideas, and just plain have fun crafting.  Today's project, is a simple but very cute one to make. You will need to visit a local office supply store, and purchase legal size writing pads. You can have them cute them for you in half for a very small fee. I paid $2.00 for them to cut 12 legal size pads, and this process only takes a few minutes. So each pad once it's cut, will only cost you abut $.53 each. So this will make a very cute and inexpensive gift to make for teachers,co-workers, or any friend.  So far I made 3, but I plan on making more when I get a chance. These are the 3 that I made.

 I took a piece of heavy card stock and scored it at 2 3/4",7 1/2" and 7 1/2". That's it for the cover, pretty simple huh?  Then I took some Red Sticky Tape and adhered the writing pads to the right inside part of the card stock. When you put the paper on the cover , it should open like a book. Like the photo below.


 The 2 3/4" side is folded inwards to create a pocket on the left inside part of your cover, like in the picture below.

  That's  it now, the fun part begins. This is where you embellish it with what ever your little heart desires. I chose 2 different designs. One is more formal with a monogram letter and a beautiful flower. the other 2 are a bit more playful and full of color. This flower was made using Stampin Up's Fun Flowers Die for the big Shot. I embossed it with SU Vintage Wallpaper embossing folder. I added a Pearl in the middle and some stickles along the edge of the flower.
In the picture below: I purchased the felt flowers on a vine several years ago at an Expo. I am finally using it. I did add some colored pebbles, which I had purchased at Heart2Home. They come in 25 different colors. It added a bit of shine and dimension to the flowers. If you like to check these pebbles out. I have put a link to the Heart2Home store at the bottom of my blog. Tell them Lisa sent you.


I hope you like my post today.

Thank you for stopping by and Happy Crafting.
Related Posts Plugin for WordPress, Blogger...