Saturday, November 27, 2010

Corrina's Quilt

One of my other hobbies, other than Paper crafting is quilting. I am just learning how to do this new hobby. I made this for my daughter. I wanted it to look very feminine and pretty. I purchased the fabric at Wal-Mart. The pattern I used was a Dresden Wedge. I had to cut 240 wedges and then put them together to form the circle. I am very proud of this quilt. It took me about 2 weeks to do it. I still have not done the binding. For some reason I am intimidated. I do need to get over that and finish it so she can use it. I hope you like it.

This is when I started to put some pieces together to see how it would look.


This is after Di quilted the top for me. I just loved how it came out. She did an excellent job.


This is what it looks like from the back, Just a lovely as the front.

It has been done since September, I hope to do the binding in the next week, before I get my sons quilt back to finish the binding as well.


Wednesday, November 24, 2010

Thanksgiving cards

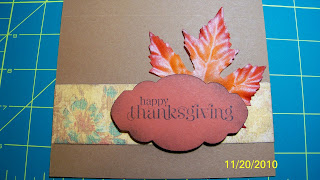
Here are the cards I made during my kids nap. It put them together in about 1 1/2, I made 12 of them
I used Heritage paper pack by K&Co. that I bought from the Crafting Place. Song bird Cartridge for the tag,Stampin up Thankful For.... Stamp set,S-U soft suede ink for the edges, crafting leaf I got at Michaels.

 For the inside I used Stampin up Top Note and same ink and stamp set.
    For the base of the cards I used various Stampin up cardstock in fall colors.


  I want to wish all of my family and friends a safe and happy Thanksgiving.
 There are many blessings in my life which there are too many to list, But I am eternally grateful for my life and everyone who is in it.

Tuesday, November 23, 2010

New Carts

I finally recieved my new cartridges that I order with Cricut.coms black Friday Sale. I can't wait to get a chance to play, I will post as soon as I make something.

Accident I stumbled across/Word Card

This was a card I made by total mistake.
I used my Gypsy and by accident I welded a card and a phrase from 2 different cartridges. This opened my creativity to whole new level. Once I figured out how to do this, I had a Ahhhhaaaa moment.
You can do this with the design studio as well as with your Gypsy.

I am going to try and give you instructions, the best I can. Just in case you would like to make one to. This will apply to any phrase or image you would like to weld from any cartridge.
1. On the Gypsy select your card base. You will also need to decide the finished card size including the phrase as well.
2. create your phrase or select an existing phrase of your choice.
3.Group together using the group button.
4.weld your images together.
5.Using the nudge arrows, nudge your 2 items so they are slightly overlapping ( the one I did,I welded vertically)
6.View to make sure the have welded together by pressing the EYE button.
Before you cut, keep in mind that you will be folding this in half. So if you finished welded images on the Gypsy measure 10" tall then you card will be 5" when folded.
Please feel free to contact me, if you are having trouble, or need more detailed instructions.
I love my Gypsy and I love helping people to use theirs.

Thursday, November 18, 2010

Toy Story Piggy Bank Card

This is a card I made, when I dicovered how to make a card ,even if the image is not designed to be a card. I used my Gypsy and welded 2 Hammys together, and continued with the layers to complete the card. I did cut  the slot out on top to insert money to make it a money card. This was just a practice card. But isn't this a great kids money card.

Wednesday, November 17, 2010

Fright Night

This is a 2 page layout that I worked on at my monthly Cricut Divas meeting @ The Crafting Place.
This was real fun to do, we used the Happy Hauntings cartridge.


 I took it one more step to add something really cool to the layout. I cut out very tiny pictures of my kids and put them behind the windows,almost as if they are looking out. It came out really cute. This was designed by Penny S. Great job Penny

Happy Hauntings Skeleton

This is a Skeleton that I made using the Happy Hauntings cartridge. This was for my friends booth at work. She wanted to decorate for Halloween. It came out so much better tha we thought it would.  I used Michaels Green and Black glitter paper, along with some black and purple Stickles.

Well today is my first day with my first official blog. Still working on details but I should be posting something soon.

Related Posts Plugin for WordPress, Blogger...