Hello there and Happy Sunday to you. This weeks post is of a Die Cut Swap I participate in. We have to make 8 of the same die cut with the Cricut. The theme was graduation lol, can you tell.
These are my little graduates for the swap. They are cut at 4"
The cartridge I used was the Recess Lite
This is another swap cut for a wedding themed swap. This was also cut at 4"
I used the Tie The Knot cartridge.
This is a Vinyl decal I made for Cecy to advertise the Jewelry she sells. This was truely a big challenge for me. I made this with my Pazzles. I actually made this with a lot of indiviual shapes and welding. Its really hard to see the wording because it's in white vinyl.
Thank you for stopping by and visiting me. Have a great day.
Showing posts with label Stickles. Show all posts
Showing posts with label Stickles. Show all posts
Sunday, June 10, 2012
Cricut Challenge 29
Labels:
Cricut E-2,
Cricut Gypsy,
Cricut Recess Lite,
Cricut Tie The Knot,
Pazzles,
Pazzles Craftroom,
Stickles
Sunday, February 6, 2011
Corrina's Birthday Invites
My daughter just loves Cinderella, so this year her birthday party theme will be Cinderella of course. My poor baby really doesn't have her first birthday until February 29th, 2012. So we have made an exception, to still have an annual party for her even though she is a Leap Year baby. I used the Cricut Happily Ever After cartridge. I cut Cinderella at 5", she fits perfect in an A2 envelope. I can't wait to order her cake, Andy makes fantastic cakes for my family.
I hope everyone is having a wonderful week-end. And for those of you watching the game, have a cold one for me.
I hope everyone is having a wonderful week-end. And for those of you watching the game, have a cold one for me.
Thursday, February 3, 2011
Valentine's Goodie box
I was trying to create something cute for Valentines day, I used some left over Top Note Die cuts I had made. I added some punched out hearts to the bottom, using Stampin Up's little heart punch. I also cut the doves from Cricuts Sweethearts cartridge. I added a bit of Stickles to the heart. As you can tell That I love to use Stickles on my projects. I get my supply of Stickles from one of my favorite online stores,
http://www.webstore.com/13394,user_id,shop, you can find some great deals here for crafting supplies.
http://www.webstore.com/13394,user_id,shop, you can find some great deals here for crafting supplies.
Wall Sign
This was this weeks craft project, that we started on Monday. I have been really busy and I finally got a chance to add the finishing pearls on it. I used Once Upon a Princess Cricut cartridge to cut out the foundation out of chipboard,which I purchased from ARC Paper. The Cardstock is from DCWV paper stack called Sweet. The letters I cut from Hello Kitty Cricut Font cartridge. The butterflies are from Martha Stewart punch. I punched 2 to make a fluttering butterfly. I added Stickles to the flowers along the bottom border and the the wings of the butterflies. I also added a Spring mix of Flower Soft for the body of the butterfly. The pearls are from good old Wally World (Wal-Mart). I am going to place this above the window, in front of my craft table.
Corrina's favorite color is PINK. LOL
The original one that I cut was to small, so I made one for my daughter to hang in her room. I hate to be wasteful, so this is what I came up with for her.
Labels:
DCWV,
Martha Stewart,
Once Upon a Princess cartridge,
Stickles,
Wal-Mart
Tuesday, January 25, 2011
Cupcake Birthday cards
I made this cute cupcake card for a couple of my friends who had birthdays this month. I used the Sweettreats cartridge to cut the cupcake. I used a little bit of Stickles to add some sparkle to the wrapper. I also used white puffy glitter paint for the white dot on the cherry. I also matted the cupcake with a piece of white cardstock, that I embossed with Devine Swirls embossing folder by Cuttlebug.
Friday, January 21, 2011
Scallop Circle Flower
Hello there everyone, I hope you are all having a wonderful Friday. I am sure looking forward to this week-end. I plan on getting some crafting done. Today's project was inspired by a good friend Erlinda. She put a post up on her blog, on how to make your own beautiful flowers. If you have time, check out her work and send her some love. http://stampinwitheerlinda.blogspot.com/
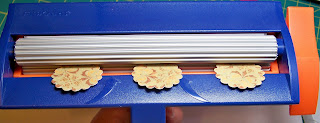
To start, get some scrap paper that you would like to use. Now you can either use a scallop punch from Stampin Up or you can cut the scallop circles using your Cricut Expression. Either way it will have the same results. I used both for my flowers. You will need 3 scallop circles for 1 flower.
I tried the pattern paper scrap, just to see how the flower will come out. Then you will need to run them thru a paper crimper, about 12+ times, to loosen the fibers enough to pull the layers apart.
Once you have the 3 circles crimped and pulled apart, you will need to crumple them some more. I just rolled them up in a ball.
Once you have rolled them, you will need to open them up and stack them together inside side up. I alternated with the soft side and the patterned side, just to see what it would look like.
Now, with a paper piercer you will need to pierce a hole in the middle of your stack.
Don't remove the piercer until you have a brad ready to put in its place. Any brad will do, you will barely see the brad when the flower is complete.
From this point you will need to start bunching up the layers individually.
Once they are all bunched up, just lightly fan them out, This will be a matter of preference. If you want a tight flower don't fan it out to much, but if you like it loose, then fan it out more. Play with it until you find the way you like your flower to look like.
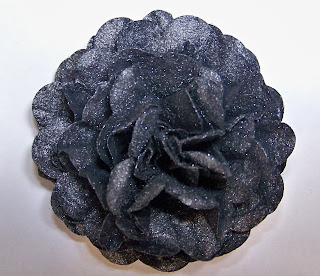
I did take it one step further and added a little touch of Stickles on the edges randomly.
Here are a few more sample flowers I made.
On the black flower, I did use some glimmer mist, just to see how it would look like.
It gives it a little shimmer finish.
Check out Erlinda's blog, she did a beautiful layout using the flowers she made. This is a great way to use up any scraps that you may have accumulated. I know I have tons of scraps. Another great idea is to make 2 of the same flower and get a craft stick and sandwich them together to make a carnation. This would be a great gift for Mothers Day, Flowers made with love. I just thought of that, as I was typing.
Enjoy your week-end. Please let me know what you think.
Wednesday, December 29, 2010
Toy Story Paper Piecing and 2 page layout
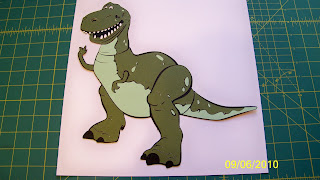
I made this 2 page layout from the left over characters from my sons 4th birthday party. it took me about 2 month to make all the characters from the Toy Story Cricut cartridge. The background paper is Bo Bunny (petal pushers) ,the paper for piecing is Bazzills and ARC Shimmer paper, I also used Stickles.
For Mrs. Potato Head I used ARC's shimmer paper, which I just love love love. You should get some.
I also used shimmer paper on Bullzeye.
I know this is older work but I thought I would share it with you, It was an experience to make all of these characters. I truly found my calling with the Cricut Expression. I love to do characters, they are a bit challenging sometimes but in the end all the hard work is so worth it.
I hope you have a great day. I would love to read your comments.
Monday, December 27, 2010
Mom's Christmas Cards
Well my friends, Christmas has come and gone, But I forgot to share this other card I made for my mom. I made this in November, but I forgot to take pictures of it. So I finally got 1 back to share with you. I had literally just got into stamping, (Thanks Gail) lol, so I wasn't very creative. I did copy this from the
Stampin-Up Catalog. I honestly don't remember all the colors I used, oh well. I did use stickles,a SU Border punch,a glitter marker,distressing stripes Cuttlebug embossing folder,SU Stamp,and a gold ribbon.
The picture doesn't show but I did color the image with color pencils, but it's so light that the camera did not pick it up. So this is, to be honest my first stamped card I made.
Thursday, December 16, 2010
BRRRR.......
Well, I worked on this yesterday. It's a kits I purchased a while ago, I just didn't know what pictures to put on it. I think I found the perfect ones. OK so I am a little behind on my scrapbooking, but I am trying to catch up. These pictures were taken 2 years ago when we actually had snow in Vegas ( Shocker) Really we did. The kits was simple to put together, the only thing I changed is that I added Stickles and Bling to the snowflakes. I think it came out cute. Glad I was able to finally use it.
These photos where taken as the snow was falling in our backyard.
The larger photo was not altered in any way, I think the picture came out perfect.
I hope you enjoy my layout. I was going to post another Christmas one , but on the layout it said 2010, but the photos where 2008, I have to make the correction. I had duh moment. LOL
Have a great day
Sunday, December 12, 2010
Snowman Topnote Goody Bag
Well this was a very fun project, I had to copy from http://stampinwitheerlinda.blogspot.com/2010/12/snowman-top-note-mini-album.html. This worked out perfect for my Husbands Christmas potluck lunch at work.
I first started by cutting the topnotes for the bags. 2 topnotes per bag are needed.
I used Stampin up TopNote die, The card stock I used was red by ARC Papers purchased at The Crafting Place.
Then I embossed the topnote with the Cuttlebug and Swiss Dots embossing folder purchased at the crafting place @ 3560 East Russell Rd. Las Vegas Nv 89120
Then I cut out the box to sandwich between the top notes.
I assembled the box with red tacky tape.
From this point add the top notes to each side.
I also added some punch outs of snowflakes using Martha Stewart punches,I added some pop dots for dimension.
I also pieced snowmen using the Cricut Expression and the Christmas Cheer Cart.I also used Stickles on the hat and on the button holes. I cut the Snowman at 3".
I think it came out really cute, and a great office gift. I filled mine with a dozen mini Christmas tree cookies in Cello bags.
Labels:
ARC Paper,
Cricut,
Cuttlebug,
Martha Stewart,
Stampin up top note Die,
Stickles,
Swiss Dots embossinf folder,
The Crafting Place
Subscribe to:
Posts (Atom)


